Moving from Spring Boot to Quarkus

After nearly a decade of coding with Spring Boot, I decided to switch to Quarkus (and was quite late to the party) for a workshop about how to embrace the API-First approach in Java.
A few years ago, I had already given it a spin. I was not entirely convinced of the value of switching. By the way, I presented in 2022 a talk about that topic with a former colleague of mine Jean-François James. We compared both of the two solutions and concluded the functionalities provided by Spring Boot & Quarkus were sightly similar.
With 2-3 years having passed. I then decided to revisit Quarkus and see how it has evolved. Although there are some still missing features, I was really impressed. I will then try to sum up in this article my journey so far from a developer’s point of view.
1 The context
Instead of reusing one of my existing workshops, I chose to start a new platform from the ground up.
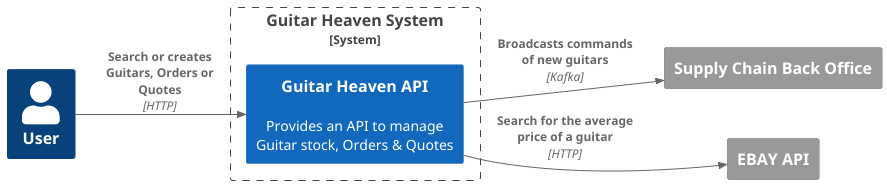
Here is the context diagram:
And the container diagram:
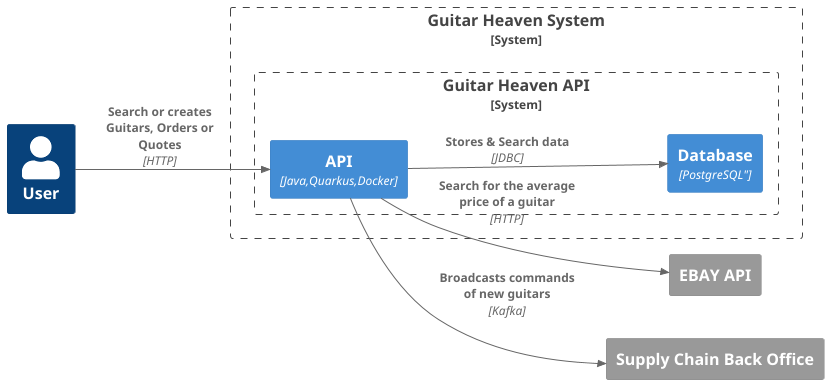
Basically, it is a simple monolithic application with a database which reaches external services:
- EBay.
- A back office called through Kafka.
The code repository is available on my GitHub account.
2 Developer experience
My first surprise, was when I started the Quarkus Dev. After generating the project and selecting the different requirements, I ran into two main components which, in my view, significantly improve the Developer Experience (DX) and go far beyond I used to with Spring:
- The Dev UI
- The Dev Services
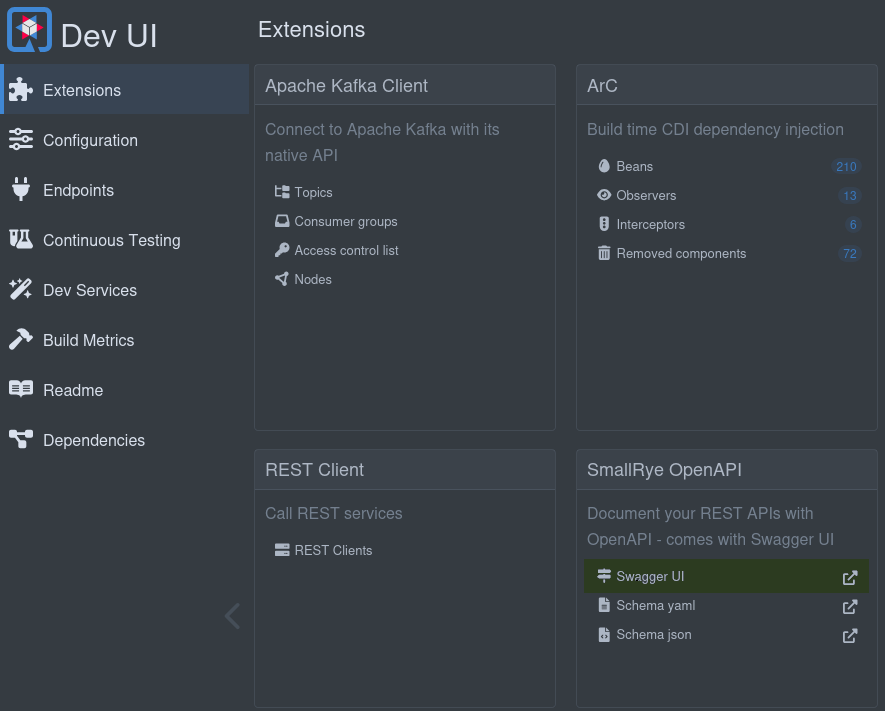 The DevUI extensions page
Usually many developers look down on Java because it is hard to setup and the integration with external services could be painful. Through these two tools, I think Quarkus found a smart answer to these worries.
Once you defined your extensions such as PostgreSQL, you have automatically the corresponding dev services enabled and you can use them either in your integration tests or directly through the dev mode.
Last but not least, you can browse all of these through the dev-ui. As mentioned in the Quarkus Guide.
- quickly visualize all the extensions currently loaded
- view extension statuses and go directly to extension documentation
- view and change Configuration
- manage and visualize Continuous Testing
- view Dev Services information
- view the Build information
- view and stream various logs
Concretely, what it means for me? I do not have to bother me again on setting up a local Docker compose environment for testing the plateform locally!
Usually I had to setup and provide to developers such a tooling to enable local testing.
Although Spring also provides Dev Services, I think (it is only my opinion), Quarkus brings it as a end to end solution to developers.
2.1 What about the documentation ?
I usually said the documentation belongs to the deliverables. I was well surprised by the Quarkus guides. They are straightforward and help you adopt Quarkus easily. I guess the authors made a special effort on this field. For me the consequence was obvious: I really liked coding with Quarkus, it was easy to move from Spring and find the corresponding features.
3 Tools & Framework integration
As I mentioned earlier, one of the Quarkus’s strengths I pinpointed is to strongly streamline the integration of differents tools and provide a cohesive setup through its extensions.
For instance, in my workshop, I sat up the application in this way:
<dependency>
   <groupId>io.github.microcks.quarkus</groupId>
   <artifactId>quarkus-microcks</artifactId>
   <version>0.2.7</version>
</dependency>
<dependency>
   <groupId>io.quarkus</groupId>
   <artifactId>quarkus-hibernate-orm-panache</artifactId>
</dependency>
<dependency>
   <groupId>io.quarkus</groupId>
   <artifactId>quarkus-jdbc-postgresql</artifactId>
</dependency>
<dependency>
   <groupId>io.quarkus</groupId>
   <artifactId>quarkus-hibernate-orm</artifactId>
</dependency>
<dependency>
   <groupId>io.quarkus</groupId>
   <artifactId>quarkus-messaging-kafka</artifactId>
</dependency>
With this bunch of dependencies, Quarkus automatically sets up the corresponding dev services and the API to reach these external services (databases, kafka broker,…).
4 API-First Quarkus development
The purpose of my workshop was to delve into API-First. I therefore created an application built using a Code-First approach and put in practice some tools and patterns to make API-First compatible.
I then used these tools:
4.1 OpenAPIGenerator
Instead of using the Quarkus OpenAPI Server generator, I prefered using the goold old OpenAPIGenerator Maven plugin. Why? Because it offers more customisation possibilities than the Quarkus extension.
Here is how I configured it:
<plugin>
    <groupId>org.openapitools</groupId>
    <artifactId>openapi-generator-maven-plugin</artifactId>
    <version>7.10.0</version>
    <executions>
        <execution>
            <id>generate-server</id>
            <goals>
                <goal>generate</goal>
            </goals>
            <configuration>
                <inputSpec>${project.basedir}/src/main/resources/openapi/guitarheaven-openapi.yaml
                </inputSpec>
                <generatorName>jaxrs-spec</generatorName>
                <configOptions>
                    <apiPackage>info.touret.guitarheaven.application.generated.resource</apiPackage>
                    <modelPackage>info.touret.guitarheaven.application.generated.model</modelPackage>
                    <library>quarkus</library>
                    <dateLibrary>java8</dateLibrary>
                    <generateBuilders>true</generateBuilders>
                    <openApiNullable>false</openApiNullable>
                    <useBeanValidation>true</useBeanValidation>
                    <generatePom>false</generatePom>
                    <interfaceOnly>true</interfaceOnly>
                    <legacyDiscriminatorBehavior>false</legacyDiscriminatorBehavior>
                    <openApiSpecFileLocation>openapi/openapi.yaml</openApiSpecFileLocation>
                    <returnResponse>true</returnResponse>
                    <sourceFolder>.</sourceFolder>
                    <useJakartaEe>true</useJakartaEe>
                    <useMicroProfileOpenAPIAnnotations>true</useMicroProfileOpenAPIAnnotations>
                    <useSwaggerAnnotations>false</useSwaggerAnnotations>
                    <withXml>false</withXml>
                </configOptions>
                <output>${project.build.directory}/generated-sources/open-api-yaml</output>
                <ignoreFileOverride>${project.basedir}/.openapi-generator-ignore</ignoreFileOverride>
                <modelNameSuffix>Dto</modelNameSuffix>
            </configuration>
        </execution>
    </executions>
</plugin>
This setup generates at the build time both the model classes and the Server API interfaces.
4.2 Quarkus OpenAPIGenerator
To generate the REST API client, I then chose to use the Quarkus OpenAPI Generator extension.
It is really easy to implement. Add just this extension:
<dependency>
   <groupId>io.quarkiverse.openapi.generator</groupId>
   <artifactId>quarkus-openapi-generator</artifactId>
   <version>2.7.1-lts</version>
</dependency>
Define then the following properties in the [src/main/resources/application.properties]:
quarkus.openapi-generator.codegen.input-base-dir=src/main/resources/openapi-client
quarkus.openapi-generator.codegen.spec.ebay_buy_openapi_yaml.base-package=info.touret.guitarheaven.infrastructure.ebay
quarkus.openapi-generator.codegen.spec.ebay_buy_openapi_yaml.model-name-suffix=Dto
quarkus.openapi-generator.codegen.spec.ebay_buy_openapi_yaml.use-bean-validation=true
There is plenty of configuration parameters you can use. If you want to know more, you can browse the documentation.
4.3 Small Rye
Like other services accessible through the DevUI, the Small Rye Swagger UI is really interesting. Once you add the Rest-Jackson extension enabled, the Swagger UI is automatically plugged to your API when you run the dev mode.
Although I would prefer using Redocly instead, the way the SwaggerUI is automatically brought in this setup is enough for me to use it.
4.4 Microcks
Microcks offers a facility for mocking external services. With the Quarkus Microcks extension, you can use it similarly to other dev services. I won’t delve deeply into this topic because, aside from integrating it as part of the dev services, the functionalities are similar to those in Spring Boot.
5 Persistence
I must admit. I do like Spring Data and the way it abstracts and generates the JPQL queries through the interface methods naming. At the beginning of my migration journey, I thought moving to Panache would be challenging.
I was wrong.
Although I missed some functionalities of the Spring Data CRUD Repository, I found my footing easily. Panache offers two modes of usage: the Active Record pattern and the repository pattern. I chose the latter for two reasons:
- Mocking a repository is easier than mocking static methods with Mockito
- I prefer to keep data separate from the persistence methods.
Anyway, using Panache let you using more JPQL Queries than with Spring Data. Whether is it good or bad, I am not sure. What can I say that shifting from Spring Data to Quarkus is quite straightforward for a Java Developer.
6 Rest client
Whether you use the Spring Rest Client or Spring OpenFeign Client, you can switch to Quarkus Rest Client easily.
I found the usage straightforward.
You can inject it as a field in your code:
@RestClient
private EbayClient ebayClient;
define the client:
@RegisterRestClient
@Path("/item_summary/search")
public interface EbayClient {

    // (1)
    @GET
    SearchPagedCollection searchByName(@RestQuery("q") String query);

    //(2)
    @ClientExceptionMapper
    static RuntimeException toException(Response response) {
        if (response.getStatus() == 400) {
            return new RuntimeException("The remote service responded with HTTP 400");
        }
        // Disabling some issues with the EBAY Mock
        return null;
    }
}- The client is automatically generated and plugged to the remote endpoint through the URL specified in the
application.properties:
quarkus.rest-client."info.touret.guitarheaven.infrastructure.ebay.EbayClient".url=${quarkus.microcks.default.http}/rest/Browse+API/v1.19.9
quarkus.rest-client.extensions-api.verify-host=false- We can also customise the error management with the ClientExceptionHandler.
Et voilà
Most of the boiler plate code is therefore removed and you can focus on what it worths.
By the way, in my workshop on API-First, I then generated the RestClient class from the OpenAPI file.
7 Kafka Integration
The Kafka integration is also pretty straightforward.
Whether you broadcast messages or fetch them, the connection layer is automatically handled by Quarkus:
@Inject
@Channel("guitar-requests-out")
Emitter<Record<UUID, GuitarRequest>> guitarRequestEmitter;/**
 * Sends message to Kafka
 *
 * @param guitarRequest : The Guitar to send to Kafka
 */
public void requestForNewGuitars(GuitarRequest guitarRequest) {
    LOGGER.info("Sending Guitar Request to supplier : {}", guitarRequest.requestId().toString());
    guitarRequestEmitter.send(Record.of(guitarRequest.requestId(), guitarRequest));
}/**
 * Fetches the kafka topic
 * <b>This method is only for testing purpose during the workshop</b>
 *
 * @param guitarRequestRecord: The Kafka record of the Guitar to send
 */
@Incoming("guitar-requests-in")
public void traceRequestsForNewGuitars(Record<UUID, GuitarRequest> guitarRequestRecord) {
    LOGGER.info("Received new Guitar Request: ID: {} - NAME: {} - QTY: {}", guitarRequestRecord.key(), guitarRequestRecord.value().guitarName(), guitarRequestRecord.value().quantity());
}
The configuration of the Kafka Client is then configured in the application.properties file:
# --------------------------
## KAFKA Client configuration
# --------------------------
quarkus.kafka.devservices.topic-partitions.guitar-requests=1
mp.messaging.outgoing.guitar-requests-out.connector=smallrye-kafka
mp.messaging.outgoing.guitar-requests-out.topic=guitar-requests
mp.messaging.outgoing.guitar-requests-out.key.serializer=org.apache.kafka.common.serialization.UUIDSerializer
mp.messaging.outgoing.guitar-requests-out.value.serializer=info.touret.guitarheaven.infrastructure.kafka.GuitarRequestSerializer
mp.messaging.outgoing.guitar-requests-out.auto.offset.reset=earliest
mp.messaging.incoming.guitar-requests-in.connector=smallrye-kafka
mp.messaging.incoming.guitar-requests-in.topic=guitar-requests
mp.messaging.incoming.guitar-requests-in.key.deserializer=org.apache.kafka.common.serialization.UUIDDeserializer
mp.messaging.incoming.guitar-requests-in.value.deserializer=info.touret.guitarheaven.infrastructure.kafka.GuitarRequestDeserializer
mp.messaging.incoming.guitar-requests-in.auto.offset.reset=earliest
It was just a simple integration. For more information, you can check out the guide and the examples. Nevertheless, thanks to the Dev Services, we can use RedPanda in development to pop a Kafka Stack and avoid configuring a Docker compose stack to enable it during integration tests.
8 Difficulties and some functionalities still missing (from my point of view)
8.1 Testing
The main difficulty I faced was writing and running my integration tests.
Quarkus offers the @QuarkusTest facility for creating and running integration tests, and it works well. It is automatically connected to the dev services (e.g., the database), and data is automatically imported at the test startup using the JPA standard method (i.e., using the import.sql file located in the src/test/resources folder).
My main concern was that this dataset and the JPA context were shared across all the integration tests. Once I deleted an item during one of my integration tests, I was unable to access it in subsequent tests.
While working on my project, this issue slightly annoyed me. I had to troubleshoot why my integration tests failed, even though they had passed before (a common development challenge).
I really missed the Spring Test @Sql annotation. Among other benefits, it helps me run SQL scripts whenever needed and reload my data at the beginning of my integration tests. Although it might be considered heavier, it provides more flexibility and ensures data integrity.
8.2 Moving from Spring Data
As I exposed earlier, Spring Data offers many functionalities which make the development easier. It was a bit weird recoding JPQL queries for fetching data I used to do without coding with Spring Data.
Anyway, I strongly believe it is just a detail. The scope of functionalities is, in my opinion, equivalent.
To sum up, Spring Data mostly abstracts the persistence layer, while coding the persistence layer with Quarkus involves more direct use of JPA and Hibernate (even though Panache strongly simplifies the process).
9 Conclusion
I will stop this comparison here. I haven’t explored much so far, but after spending some hours coding, I’m really pleased with the effort the Quarkus community has made to enhance the developer experience. With full support of the Microprofile specifications and its various API or facilities, Quarkus allows you to streamline your development, and write code that is straightforward and more stable over time.
One interesting point still missing is about Security. Although there is a Quarkus OpenId Connect integration, I don’t know yet what is the gap between Spring Security and it.
Anyway, I may have missed some points in my review. If so, feel free to reach out to me.
2-3 years ago, when people asked about moving to Quarkus, I didn’t see much interest. However, if I had to start a greenfield project today, it would be now my first choice.